How to create HDRI panoramas with VR Drive 2 and AutoPano Giga
I thought it would be cool do write a tutorial on how to shoot and stitch an HDRI. Maybe it helps our scouts or someone else trying to produce HDRI panoramas.
A little backgound information:
The new Roundshot VR Drive 2 is a great tool and everyone who owns this piece of hardware is really looking forward to an upcoming feature called "HDR mode". This firmware upgrade will enable you to shoot HDR panoramas with a single click on a button. This mode is currently under development and until now a release date is not in sight.
So what to do until this mode gets released? I will tell you how we to it.
You have to shoot several panoramas, each with its own exposure settings. This makes lots of images. 18mm lense, 1EV steps, 15% overlapping with a Canon 450D makes about 288 pictures. More pictures would lead to higher dynamic range but that should be good enough for most of our purposes. The process of taking these panoramas is simple. You set an exposure on your camera and wait until the VR Drive 2 is ready with shooting. You change the exposure and repeat these steps until you captured as many panoramas as possible.
Ok. Now we got lots of single images. Now comes the "fun" part. ![]()
We don't want to stitch them manually, of course. So we take AutoPano Giga, a great software for stitching panoramas. Although AutoPano does a good job on that, a new problem arises: overbright images. Even the best software can't generate links between images if the images are pure white. This often happens when you take an HDRI outside and the sky is really bright.
Here is a really nice workaround: we create HDRIs for each tile/picture of the HDR panorama. In our case we get 32 single HDRIs which we stitch together in AutoPano (yes, AutoPano can even stitch HDRIs from HDRIs!).
"How to create these HDRIs? Do you bracket photos after shooting?" Yes. I wrote a little application that detects photos inside a folder and sends them to Picturenaut. Picturenaut is a free software that can merge LDRIs (standard photos) into HDRIs and even tonemap those HDRIs. We are only interested in one part of Picturenaut called MKHDRI, a command line tool to make HDRIs. I will release my little application soon, so stay tuned!
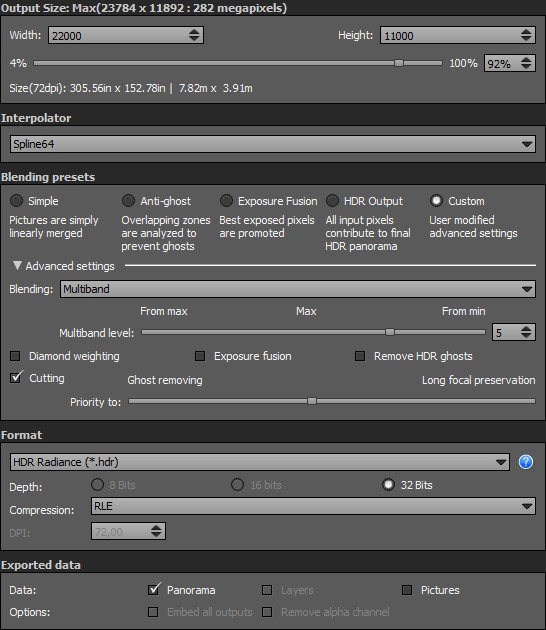
Now we are ready to stitch. We have 32 .hdr files and want to feed them to AutoPano. One little step makes this a lot easier: do exposure corrections! Don't fear, you will not make any defect to your HDR images. Don't tonemap them! Just correct them to look neither too overexposed nor underexposed. Open AutoPano and let it automatically stitch your images together. If this is done use the following settings to render out your HDRI panorama:
 Theses settings are essential! I tested lots of settings and came out with these. The Multiband level can be changed if you like but 5 seems to be great. Width and Height are linked to your panorama, of course.
 ![]()
If your panorama stitched nearly perfect you should save it as a Template (File -> Save as Template) so your next panoramas (with 32 single HDR images) will have less faults.
Your HDRI panorama is ready to get retouched! Use your favorite image editing software to correct the nadir and things like that and you will get a perfect HDRI. Have fun!
Leave a comment
You must be logged in to post a comment.